My Account
My Account is a feature that allows designated administrators to manage their subscription via the new Macquarie Dictionary website. It is available to all individual subscribers and to the primary contact under all institutional subscriptions. Read below for information about using My Account.
Who has access to My Account?
Individuals are the administrator of their own account. They will be able to access My Account with the once they have logged into the website. Institutional subscribers will only have access to My Account if they are using the administrator login details. This My Account login should only be used by the primary contact(s) of the account. All other members will have shared access to the Macquarie site but not to My Account.
How do I login to My Account?
Individual subscribers: My Account will be readily visible in the top right-hand corner of every page on the website.

Institutional administrators: To access My Account, sign in with your My Account details using either the ‘login’ button beside the search bar or the login button beneath the user icon in the top right hand side of the screen/ Then click on the ‘My Account’ link in the top-right corner to reach My Account.

Account
The ‘Account’ tab has all of your contact, billing and subscription details, as well as the administrator login details (individual subscribers are their own administrators). For institutional subscribers, this is where any additional contact persons listed on your account will appear. All fields are editable on this page.
How do I update my login details?
Individual subscribers: To change your login details, click in to your My Account. Once in My Account, you can see at the bottom of the ‘Account’ page the ‘edit profile’ and ‘edit password’ buttons. To edit your password click ‘edit password’; to change your username, click ‘edit profile’. Enter your new details and press ‘update’. A confirmation pop-up box should appear confirming the change has been made.

Institutional administrators: Admin users can change both the shared login details and the My Account administrator login details through My Account.
To change the shared login details, please visit the ‘Users’ page by clicking on the ‘Users’ tab. To edit a shared login, select the pencil icon on the login you wish to edit. Update the details as required. When complete, select the update button. A confirmation pop-up box should appear confirming the change has been made.
After updating the login details, you will also need to regenerate the shared login URL. To do so, select the ‘Key’ icon on the shared login that you have just edited. A confirmation pop-up box should appear confirming the change has been made.
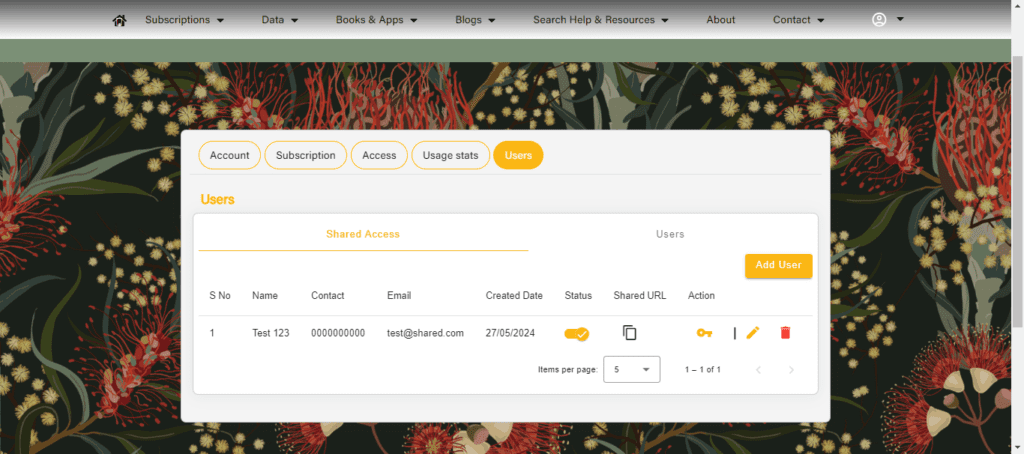
To change your My Account administrator login details please visit the ‘Account’ tab in My Account. Here you will see the same ‘edit profile’ and ‘edit password’ buttons. Enter your details or password and press ‘update’. A confirmation pop-up box should appear confirming the change.
How do I change my billing address or contact details?
To change your billing address or contact details, visit the ‘Account’ page where you will see an ‘edit profile’ button. Click on this button and enter your new/changed details then press ‘update’. A confirmation pop-up box should appear confirming these changes.
Please note that it is important that your details remain up-to-date so we at the Macquarie Dictionary may contact you with regards to your subscription.
Renewals and invoicing
This section has details for your current subscription period at the top of the page as well as the payment status for that period. Your subscription history is also located here and at the time of your renewal you will have the ability to renew your account online.
For institutional accounts only you can also request an invoice from this page.
How do I renew my Macquarie subscription online?
30 days before your expiry date, we will send a renewal notification to the email address listed on your account. if you have opted out of auto renewal, you can renew your subscription at any time after your receive the renewal notice.
To renew, select the ‘Manage subscription’ in the Account tab on My Account. On the following page select ‘Renewals and Payment History.’ On the next page select ‘Resume’ subscription. Follow the prompts to input your payment details.

Note: we do not deduct payment until your expiry date.
Institutional accounts will be able to download invoices generated for the past 7 years from the Payments history page.
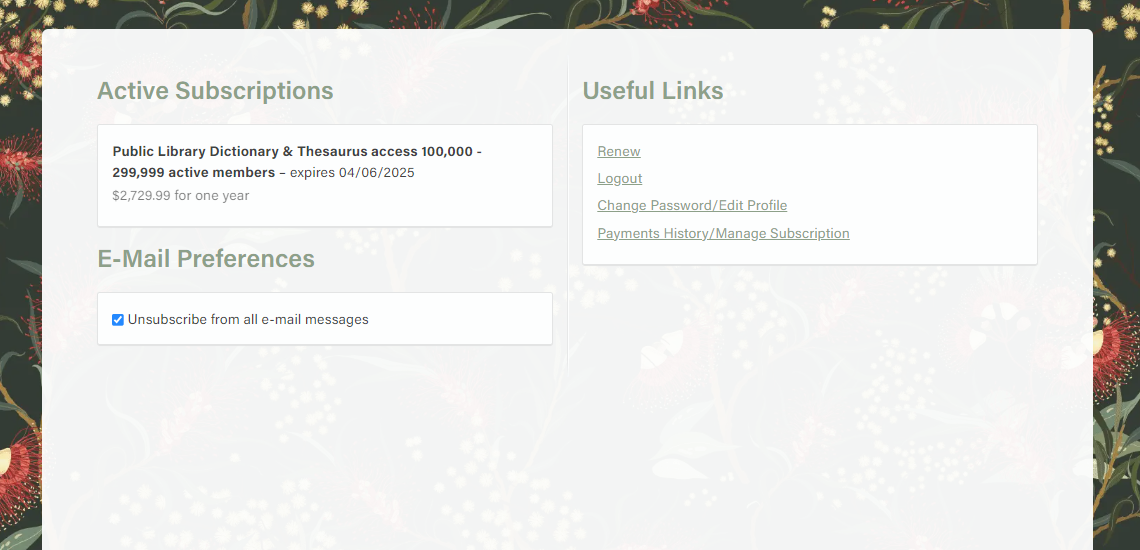
How do I request an invoice?
Institutions with over 500 users, as well as schools and libraries can request an invoice. Invoices can be requested using the request invoice button.
To activate the request an invoice function, select the Manage Subscription button in the Account tab. In Manage Subscription select Renew under the Useful Links heading. You will then be returned to the Account tab where the request invoice button will be active.

Select request invoice and follow the prompts.
This page also shows your invoice request history and allows you to pay your invoice after it has been approved. Simply click the ‘Pay invoice’ button.
If you need to update your invoice request, please contact us.
How do I pay an invoice online by credit card?
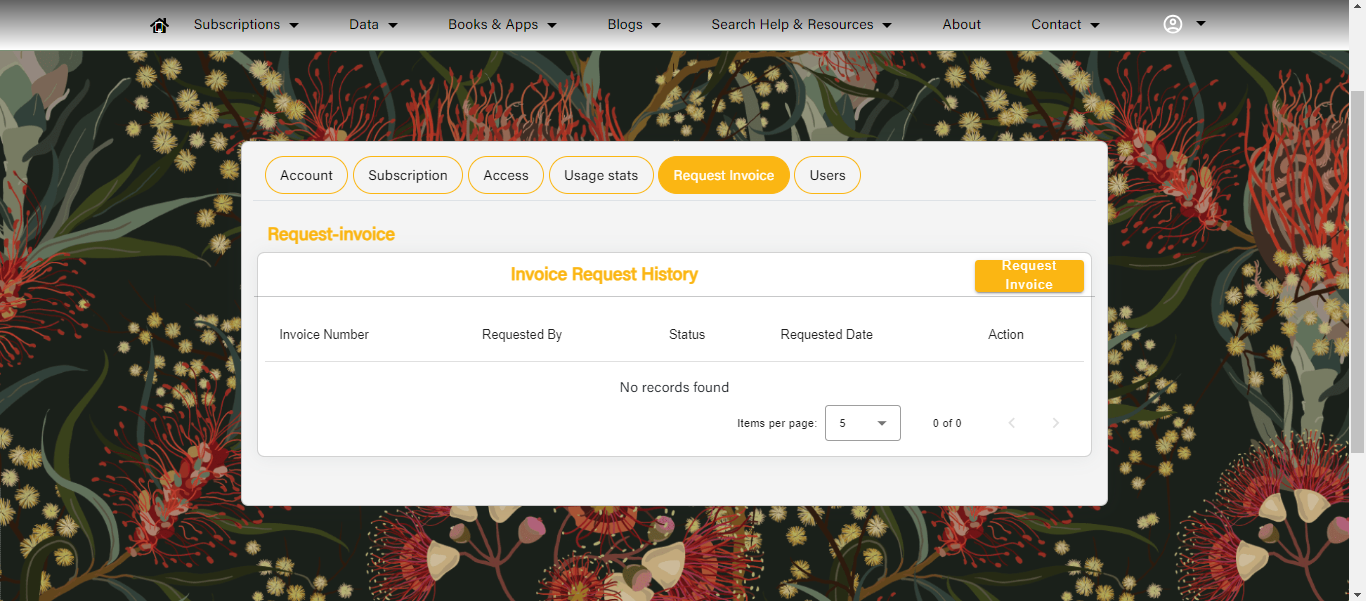
Individuals and businesses with under 500 users can pay their invoice by credit card. To pay your invoice online, visit the Manage Subscription page via the Account tab and select Renewals and Payments. Next select Resume Subscription and follow the prompts.
You can also email macquarie@macmillan.com.au to request a secure payment link that you can pay with credit card.
Note: businesses with over 500 users must pay via direct deposit. Our bank details are included on your invoice.
If I let my subscription expire, can I still renew my account online?
You can renew your subscription at any point after your subscription has lapsed.
Login to My Account and navigate to Manage Subscription via the Account tab. Under the Useful Link section, select Renewals and Payment History.
On the next page, select Resume Subscription under your expired invoice. Input and submit your credit card details. Your subscription is up and running again.
I am the administrator for a school/library account, why can’t I see the ‘renew’ button?
If you are a subscriber who is part of a consortium or group you are not currently able to renew online due to special pricing that may be in place. Your subscription will be automatically renewed by Macquarie Dictionary and an invoice will be emailed to the primary contact during the renewal month. If you wish to cancel your subscription, please email us 30 days prior to your renewal date. All cancellation requests must be in writing.
If your user numbers (students, library members, employees) have changed since your last renewal, please contact us.
How do I update or reset administrator login details?
Automatic Renewal
All individual subscribers and business subscribers with up to 500 users are opted into automatic renewal when you sign up to the Macquarie Dictionary Online.
This means that every 12 months, on your renewal date, we will charge the card you used to sign up (as long as the card is current and active) and your subscription will be renewed for a further 12 months.
NB: Auto renewal is not currently available for school, university, library or business subscriptions (over 500 users). For details on how to renew, see the Subscription section above or contact macquarie@macmillan.com.au
How do I update my card details?
If your credit card details change before your subscription renewal date you will need to update your payment information to ensure your access is not interrupted.
To update your payment card details login to My Account and navigate to Manage Subscription via the Account tab. On the next page you will see the Update Credit Card Info option listed in the Useful Links heading. Click the link to the next page and follow the prompts to input your new credit card details.
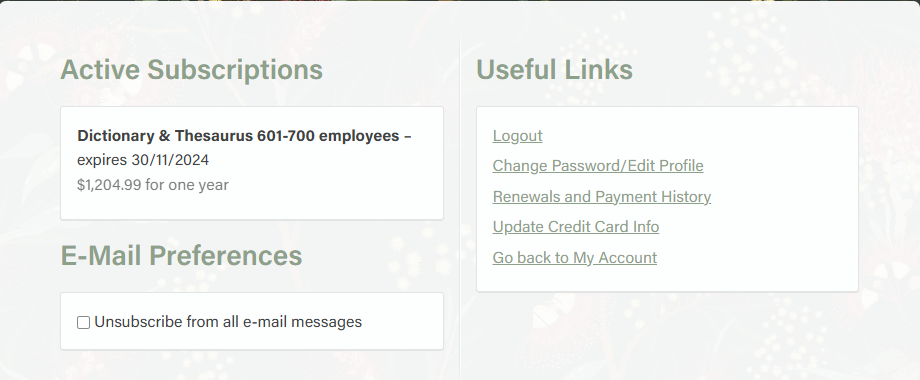
NB: The card details form is disabled 72 hours (3 days) prior to the renewal date as per the cancellation clause. You must update your card details for auto renewal before the 72 hour (3 days) window comes into effect. However, if you need to update your details within this 3-day window please contact us.
To opt out of auto renewal, log in to My Account and navigate to Manage Subscription via the Account tab. On the next page select Renewals and Payment History in the Useful Links heading. On the next screen select the Cancel beneath the Active Subscriptions heading.
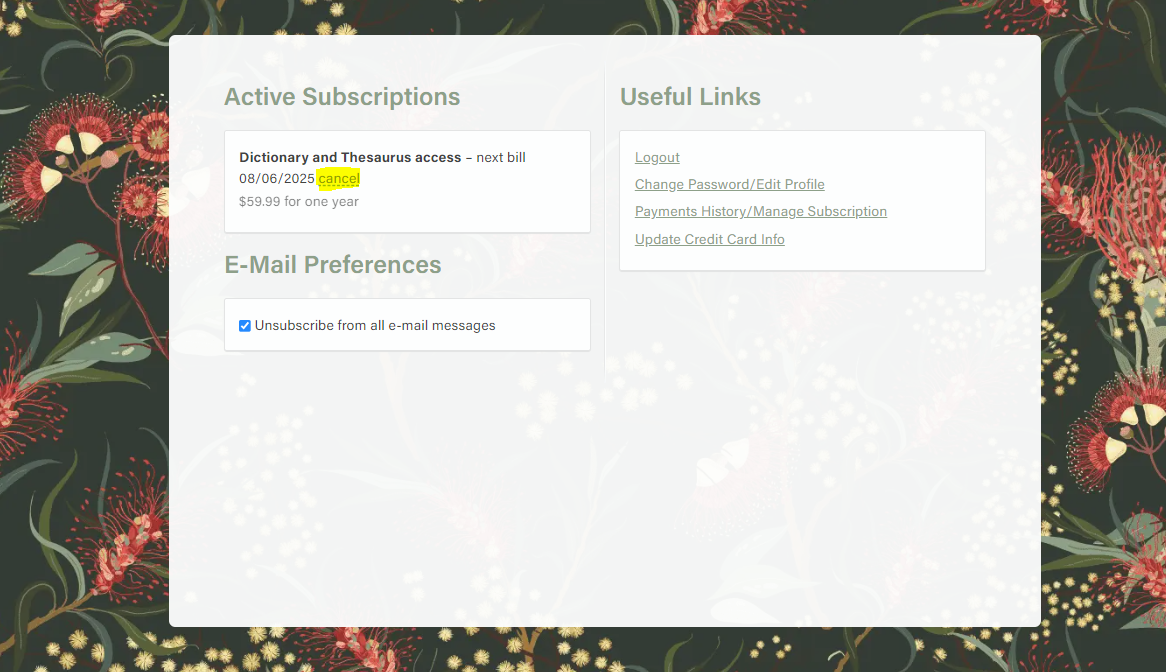
You can opt in to auto renewal again by returning to the same page and selecting Resume subscription under the Active Subscription heading.
How do I use my promo code if my subscription account is set-up for auto renewal?
If you have a promotional code for a discounted subscription, please turn off the auto renewal feature in My Account by following the ‘How do I opt out auto renewal’ guide above. Once opted out. you will need to renew your subscription manually. For more information, see our renewal guide. Or alternatively, please contact us for assistance with renewing your subscription.
NB: Auto renewal is not currently available for school, university, library or business subscriptions (over 500 users). As such promo codes for these subscription types can be added during the subscription renewal process
Access*
*Institutional subscribers only
Here is where you will find a record of your current access methods, including your shared username and a record of your IP addresses. Public libraries who have barcode access can also view these details here. You can update the shared username or password, and add, remove or edit IP addresses as needed.
What is IP access? How do I add or edit an IP?
An IP address is a unique numerical identifier for a computer connected to the internet. Setting up IP details in My Account allows users to have instant access to the Macquarie Dictionary site via IP authentication. To add an IP, log in as the account administrator and navigate to the Access tab in My Account.

Select Add IP Address in either the IP Address Range or the Individual IP Address tab depending on the kind of IP you want to whitelist. Click create to complete the process.

You will know when your IP access has been authenticated by a ‘Welcome’ message that appears in the middle of the screen when you first access the site. For example:

What are my IP details? How do I find them?
You can find out what IP access/number your computer is using by visiting one of several website that will tell you your IP or by contacting your IT department if you have a wider range or multiple sites.
What if my institution uses a proxy server?
Proxy servers act as a buffer between the user and the internet and perform a range of functions such as storing frequently used data in a cache to speed access, imposing restrictions on access to some users, or hiding IP addresses to ensure anonymity. You will need to let the Macquarie Dictionary team know if your institution uses a proxy server, what IP address it is and how many computers the proxy covers.
EZproxy: Macquarie Dictionary is a secure website and uses https protocol. Secure Socket Layer (SSL) is the technology used to provide secure network access for protocols such as https. Unfortunately, SSL features in EZproxy may be disabled by default. As a result, some EZproxy servers will need to be reconfigured for SSL.
The following stanzas are recommended for optimum performance from our website.
AnonymousURL +https://*macquariedictionary.
Title Macquarie Dictionary Online
URL https://www.
HJ www.macquariedictionary.
HJ https://www.
HJ https://
DJ www.macquariedictionary.com.au
AnonymousURL -*
To ensure your organisation has seamless access to the Macquarie Dictionary Online follow these configuration steps for EZProxy.
Begin with Enabling AnonymousURLs:
To allow EZProxy to handle specific URLs that need to remain anonymous, insert this directive at the start of your Macquarie Dictionary stanza: AnonymousURL +https://*www.macquariedictionary.com.au/*
Set the Title and Main URL:
Clearly define the resource by including its title and primary URL to ensure easy identification and access: Title Macquarie Dictionary Online URL https://www-macquariedictionary-com-au.ezproxy.lib.uts.edu.au
Include Essential Hostnames:
Direct EZProxy to manage traffic correctly by defining the necessary hostnames. This step is crucial for the proxy to recognize and route the requests appropriately: HJ www.macquariedictionary.com.au HJ https://www-macquariedictionary-com-au.ezproxy.lib.uts.edu.au HJ https://www-macquariedictionary-com-au.ezproxy.lib.uts.edu.au
Specify the Domain:
Capture all traffic within the “www.macquariedictionary.com.au” domain by concluding with this directive: DJ www.macquariedictionary.com.au
Optional: Exclude Specific URLs:
If there are URLs you wish to exempt from proxy access, the AnonymousURL directive followed by the URL pattern can be employed.
Final Steps: Following these configuration instructions, ensure to save the changes to your EZProxy configuration file and restart your EZProxy server to activate the settings.
What if I can’t give you my IP address because another entity uses it and we are all under one server?
Unfortunately, we cannot accept an IP address if another customer is using it. If this is the case and you do not wish to manually log in, please contact the Macquarie Dictionary team who will assist you in creating a password-embedded URL.
What is a shared login? What does it do?
Where is my shared login? How do I add/change shared login details such as username and password?
Business, library, school and university subscribers can create a shared login for users. To set up a shared login, sign in to your subscription using the administrator login that is used to manage the subscription’s account. Click on the My Account option (located in the top right hand side of the Macquarie Dictionary main page).
From there select the Users tab.

To add shared login details, select ‘add user’. On the next screen fill in the username, email address and password you would like to associate with your shared login. Please note you will need a separate email address to the one used by the administrator. This is so we have an account contact in the event the admin is unreachable and also to ensure the password can be reset promptly. For more information on password reset, see below. Once you have finalised your shared username details click ‘Create.’ If successful, you will be directed to the account details screen where a message will notify you that the shared username is now active.
To change existing shared login details, edit your password by selecting ‘edit password’; or change your username by selecting the ‘edit details’ button. Enter your new password or details and press ‘submit’. A confirmation pop-up box should appear confirming the change has been made.
Usage stats*
*Institutional subscribers only
Usage statistics are available from March 2024 and include a summary of sessions, page views and searches. The ‘Subscription’ search log shows a list of previously searched words, and the ‘Subscription’ page views show a list of the previously visited pages.
Usage stats from the previous iteration of the website can be supplied on request. Please contact us with the date range of your request e.g. Usage statistics request for Jan – Dec 2023.
How can I get usage stats for our institutional subscription?
At the ‘Usage stats’ page you can filter your search dates. Select the ‘Start date’ and ‘Finish date’ you wish to view your institutional usage for and then click on ‘Apply filter’.
Stats are available in the following formats:
- Account Summary – shows the number of user sessions, page views and word searches of the subscription. This will appear on the top of the stats page.
- Subscription Search Log – shows the words that have been searched. Please note, these can only be seen in fortnightly periods and will appear after clicking on the green dropdown link.
- Subscription Page Views – shows the date, username and number of page views. Please note, these can only be seen in fortnightly periods and will appear after clicking on the green dropdown link.
Can I export my usage stats?
You can export your usage stats to a CSV file. Filter the start and finish dates that you wish to view usage stats for and click on the ‘Apply filter’ button. At the main summary, click the green ‘Export’ link to download an Excel spreadsheet.

